Trail Gear Picks
How-to

How to Pack a Backpack

Where everything goes in a hiking pack, why it matters on the trail, and how to set the straps once it's loaded.

By Alex Hart
Updated Oct 2026

We earn a commission if you buy through our Amazon links, at no extra cost to you. How this worksAmazon prices as of Nov 4, 10:16 PM ET, subject to change. Details

The short version

Line the pack, put the sleeping bag at the bottom, keep heavy food and water against your back, and the things you'll need today on top.

Ultrasac 18-Gallon Compactor Bags
Start hereUltrasac 18-Gallon Compactor Bags
  1. 1.Lay it all out
  2. 2.Line the pack
  3. 3.Sleeping bag at the bottom
  4. 4.Heavy gear against your back
  5. 5.Fit the bear canister, if you need one
  6. 6.Fill the gaps and balance the sides
  7. 7.Today's gear on top
  8. 8.Small stuff in the lid and pockets
  9. 9.Strap as little as possible outside
  10. 10.Cinch, lift and adjust the straps

A well-packed backpack doesn't swing when you hop between rocks and doesn't pull you backward on the climbs. The rule is simple: the heavy, dense stuff rides in the middle of the pack, tight against your back, and everything soft fills in around it. Put it too low and the pack sags onto your hips and drags your shoulders back. Put it too high and the pack feels tippy, and on wet rock that's how you slip.

On a rooty, rocky trail, a pack that shifts is what throws you off a step. Here's how to load one, step by step, then how to set the straps once it's full.

  1. Lay it all out

    Spread everything on the floor before it goes in. You'll see what's heavy, what you won't need until camp and what you'll want in your hand at the first break. It's also when the third fleece and the spare pot go back on the shelf.

    If you carry a hydration reservoir, fill it and put it in first, in its sleeve against the back panel. Sliding a full reservoir into a full pack is miserable.

  2. Line the pack

    The weekend I stopped trusting pack fabric was a drizzly one at Flat Laurel Creek: a light rain that never quit, and by the second camp the foot of my sleeping bag was damp. A damp bag at bedtime means a long, cold night.

    Pack fabric isn't waterproof, and neither are the seams or the zippers. The fix almost every packing guide agrees on is a liner: a big plastic bag inside the pack, with everything that has to stay dry inside it. Your sleeping bag and your warm layer are the two things you can't afford to get wet.

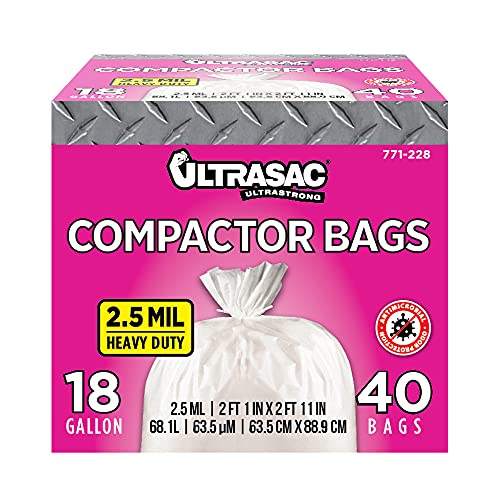
    Most hikers use a trash compactor bag. It's thicker than a kitchen trash bag, which tears on the first sharp corner, and it costs pennies. The Ultrasac bags are 2.5 mil, thicker than the 2 mil Amazon Basics bags, and 25 by 35 inches. Buy unscented: some compactor bags now come with a "fresh" scent, including the Brute bags some guides still recommend, and you don't want your sleeping bag smelling like a laundry aisle.

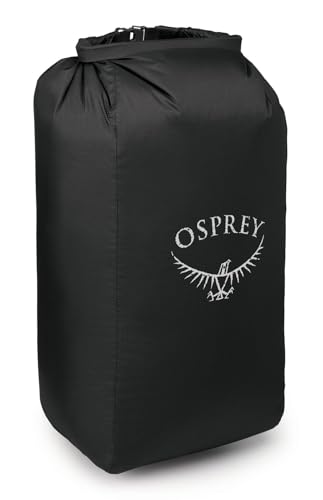
    A liner beats a rain cover. Covers catch wind, and water still runs down your back and into the pack where the cover can't reach. If you want something sturdier than plastic that you buy once, the Osprey liner is a proper roll-top dry bag cut to the shape of a pack.
  3. Sleeping bag at the bottom

    The bottom of the pack is for things you won't touch until camp: your sleeping bag, a sleeping pad if it rolls small, the clothes you sleep in, camp shoes. They're soft and light, so they make a cushion under the heavy load instead of dragging at your hips. Some packs even have a separate compartment down there for the sleeping bag.

    Guides also argue about whether to stuff it in a compression sack. If you use a liner, you can push the sleeping bag in loose at the bottom and let it fill the corners. If your pack is small or you skip the liner, a waterproof compression sack like the eVac squeezes it down and keeps it dry on its own.

    Heavy1234567
    1. 1Lid map, snacks, sunscreen
    2. 2Top rain jacket, first aid, filter
    3. 3Core, against your back food, stove, extra water
    4. 4Fill tent, spare clothes
    5. 5Bottom sleeping bag, camp clothes
    6. 6Side pockets water bottles
    7. 7Hipbelt pocket snacks, phone
    Dense, heavy gear rides against your back between the shoulder blades; soft, light gear fills the bottom and the space in front. The dashed line is a liner, with everything that must stay dry inside it. Schematic, not to scale.
  4. Heavy gear against your back

    The core of the pack, the middle third pressed against your back, is where the weight goes: your food for the trip, the cook kit, the stove, extra water. Keep it mid-back, between your shoulder blades, and as close to the back panel as it will go. The closer the weight is to your spine, the less the pack pulls you backward and the less it sways when you step down off a ledge.

    Guides disagree a little on height. Some say mid-back, some two-thirds up, some lower toward the hips. Mid-back is right for most trails. On easy, smooth paths you can carry it a bit higher; on rough, rocky ground I'd keep it a little lower, because a high load is what tips you over.

    If you carry a liquid fuel bottle, keep it upright, cap tight, and below your food rather than next to it.

  5. Fit the bear canister, if you need one

    Some parks and forests require a hard-sided canister for food, and a canister is often the bulkiest thing in your pack. It goes in the core with your food and everything that smells, toothpaste included.

    Lying sideways on top of the sleeping bag is the best spot when your pack is wide enough, because it fills the width and keeps the weight centered. If it doesn't fit that way, stand it upright against your back. The BV500 is 8.7 inches across and 12.7 inches tall, so if you're shopping for a pack and a canister at the same time, check that one fits the other.

  6. Fill the gaps and balance the sides

    Now stuff the soft gear into every space around the hard stuff: the tent body and fly, spare clothes, the camp towel. Pack in layers, filling each one side to side, instead of stacking things in tall piles. A pack with no empty pockets inside doesn't shift as you walk.

    Check the sides as you go. If all the water ended up on the left, you'll feel it by lunch. Splitting water between two bottles, one in each side pocket, helps keep the weight even.

  7. Today's gear on top

    The top of the main compartment is for what you might need before camp: your rain jacket, an insulating layer for breaks, the first aid kit, the water filter, the toilet kit. If a storm is likely before you reach camp, some hikers put the tent up here too, so it's the first thing out.

    Your trail lunch and the day's snacks go here as well. Dinner stays in the core.

  8. Small stuff in the lid and pockets

    The lid, sometimes called the brain, holds the small things you reach for all day: the map, sunscreen, bug spray, a headlamp, snacks, your keys.

    Hipbelt pockets are the best real estate on the pack, because you can reach them without stopping: snacks, phone, lip balm. Water bottles ride in the side pockets. Our guide to water bottles for hiking starts with the wide-mouth Nalgene, which slides into the side pocket of most packs.

    Don't overload the side pockets with anything heavy besides water. The goal is still to keep the weight centered over your spine.

  9. Strap as little as possible outside

    Some gear has to ride outside: trekking poles when you aren't using them, a foam pad, an ice axe, snowshoes, a camp chair. Keep it to a minimum. Everything strapped on the outside catches branches and swings when you walk. If you find yourself strapping on half your kit, the pack is too small or the load is too big.

    Poles go in the side loops or under the compression straps. Our guide to trekking poles includes folding pairs that come down to about 16 inches, small enough to stash, and our pick of lightweight camping chairs weighs under 2 pounds.

  10. Cinch, lift and adjust the straps

    Loosen the compression straps before you pack, then cinch them down once everything is in. Tight straps pull the load against your back and stop it from shifting.

    Don't lift a loaded pack by one shoulder strap. Grab the haul loop at the top, rest the pack on your bent thigh, slide one arm through, then swing it onto your back.

    Then adjust the straps, in this order:

    1. Hipbelt. Center it on your hip bones and tighten it snug. Most of the weight, roughly 80 percent by the usual rule, should ride on your hips, not your shoulders.
    2. Shoulder straps. Pull them down and back until they wrap your shoulders without carrying the load.
    3. Load lifters, the small straps between the top of the shoulder straps and the pack. Snug them to about a 45 degree angle to pull the top of the pack toward you.
    4. Sternum strap. Clip it across your chest and tighten it just enough to keep the shoulder straps from sliding outward.

    After the first mile, stop and do it again. Loads settle.

On a day hike

The same rules hold with less gear. The rain jacket and the first aid kit go on top, water and lunch sit close to your back, and the snacks and phone ride in the hipbelt pocket or the side of the pack. On a wet day, a compactor bag in a daypack keeps your warm layer and your phone dry for the price of a coffee.

The best test is how often you have to take the pack off. Pack it so the things you need during the day come out without unpacking the rest. Still choosing the pack itself? Here are the best hiking daypacks across brands, and the Osprey daypack worth buying for a full day on the trail.

Gear that makes packing easier

Ultrasac 18-Gallon Compactor Bags
Start hereKeeping everything dry

Ultrasac 18-Gallon Compactor Bags

The pack liner nearly every packing guide recommends. One goes inside your pack and keeps your sleeping bag and clothes dry, for about a dollar a trip.

If you buy one thing after reading this, make it a box of compactor bags. One bag lines your pack, and the rest of the box covers you when it tears. At 2.5 mil, these are thicker than the Amazon Basics bags, which are 2 mil, and thicker plastic takes longer to wear through.

Flaws but not dealbreakers

  • They tear eventually. They're cheap enough that you just swap in a new one.
Osprey Ultralight Pack Liner
Upgrade pickA liner that lasts

Osprey Ultralight Pack Liner

A roll-top dry bag cut to the shape of the inside of a pack, with waterproofed fabric and seams, that you buy once instead of a box at a time.

This is the Medium, sized for packs from 50 to 70 liters. Osprey also makes a Small for 30 to 50 liter packs and a Large for 70 to 100 liters. It closes like a dry bag, rolled down and clipped, the fabric and seams are waterproofed, and it's cut rectangular to match the inside of a pack.

Flaws but not dealbreakers

  • It costs about the same as two boxes of compactor bags.
  • Make sure the size matches your pack. A liner too big for the pack bunches up; one too small leaves the top of your sleeping bag exposed.
Sea to Summit Ultra-Sil Dry Bag Set
Best for organizingSorting the small stuff

Sea to Summit Ultra-Sil Dry Bag Set

Three see-through dry bags in three sizes and colors, so you can find the first aid kit without emptying the pack.

Three colors and a fabric you can see through make it easy to grab the right bag in the dark of a tent. Several owners say the colors are what make it work: you know which bag holds what without opening it.

Flaws but not dealbreakers

  • The fabric is very thin. It's for organizing inside the pack, not for dragging over rock or strapping on the outside.
  • The folded collar is stiff, one buyer found, and holds its crease.
Sea to Summit eVac Compression Dry Bag 13L
Best compression sackShrinking a sleeping bag

Sea to Summit eVac Compression Dry Bag 13L

Squeezes a three-season sleeping bag down with four straps and lets the air out through the base, so the bag at the bottom of your pack takes less room.

Thirteen liters suits a three-season sleeping bag. One owner packs a synthetic bag rated around freezing into it along with a pillow and a pad, and says it all goes down small. The base lets the air out as you cinch the straps, while the rest of the bag keeps water out.

Flaws but not dealbreakers

  • That breathable base is also its weak spot. One owner on a full day of rain in Nepal found the inside wet, coming in through the bottom.
  • If you line your pack and your sleeping bag fits loose at the bottom, you don't need it.
BearVault BV500
If you need a bear canParks that require a canister

BearVault BV500

BearVault's mid-size canister holds about a week of food, and it's clear, so you can find dinner without emptying it.

BearVault says the BV500 is approved in all national parks, Yosemite and Sequoia included. It's clear plastic, so you can find what you want without unpacking it, and the lid twists off without a tool.

Flaws but not dealbreakers

  • The lid tabs are hard to press with cold fingers, and the plastic stiffens in the cold.
  • At 8.7 inches across, it's bulky. Check that it fits your pack before you buy either one.
  • In parts of New York's High Peaks Wilderness, some bears have learned to open plastic canisters. Always check the rule where you're going.
Want a pack that keeps the rain out on its own?The Best Waterproof Backpacks

How we picked

9 packing guides read5 products pickedMaker specs checked

I read nine packing guides, from REI, Switchback Travel, Andrew Skurka, Treeline Review, the Appalachian Mountain Club, the American Hiking Society, Sea to Summit, CleverHiker and Field Mag, and noted where they agree and where they don't. Where they disagree, this page gives the answer that works for most hikers and says when it changes. The liner is the one those guides recommend most; the other four answer the problems they raise (organizing, space, bear country). All five are checked against the makers' own pages and the reviews owners leave on Sea to Summit's site. Prices come from Amazon and update on this page.

Common questions

Should heavy items go at the top or bottom of a backpack?+

Neither. Heavy items go mid-back, between your shoulder blades, tight against your back. Too low and the pack sags and pulls you backward; too high and it feels tippy on rough ground.

What goes at the bottom of a backpack?+

Your sleeping bag and anything else you won't need until camp: sleeping clothes, camp shoes, a sleeping pad if it packs small. They're light and soft, so they cushion the heavy load above them.

Pack cover or pack liner?+

A liner. A pack cover catches wind and water still gets in where the cover doesn't reach, against your back. A trash compactor bag inside the pack keeps your sleeping bag and clothes dry for very little money.

Should I use compression sacks?+

For the sleeping bag, only if you need the space or skip a liner. Not everything needs its own sack: loose soft gear fills the gaps around the hard items better than a row of stuffed cylinders does.

Where does a bear canister go in a backpack?+

In the middle of the pack with the rest of your food. Lay it sideways on top of the sleeping bag if your pack is wide enough; stand it upright against your back if it isn't.

How much weight should you carry in a backpack?+

A common rule of thumb for a backpacking load is about 20 percent of your body weight, less on a day hike. How the weight sits matters as much as how much there is.

Related guides